

Ableton’s built in FM (frequency modulation) synthesizer Operator is a powerful sound creation tool that can be used to synthesize entire tracks. If the user has the patience to understand its capabilities.
FM synthesis works on a different level to additive and subtractive as it uses oscillators (known as operators) to harmonically affect other oscillators (carriers). The results of which can be vastly different to other synthesis methods.
In an attempt to demystify this process, the following steps will describe in detail how to create a basic drum kit.
The kick
In order to be able to produce a useable kick drum sound, you have to understand how a real life kick works. For the basic characteristics it is broken up into two parts:
The click of the beater hitting the skin.
And
The resonance of the drum itself.
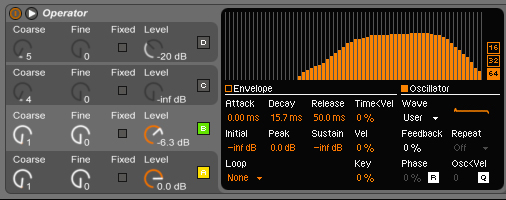
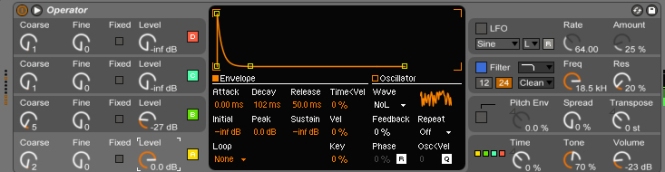
To begin with, I start by disabling all of the operators besides A. The default wave is a sine wave, which will serve as the foundation to our kick. Starting by placing a midi note on F, the amplitude envelope for A is adjusted to a sharp attack, with fairly short decay.
The basic sine wave fundamental
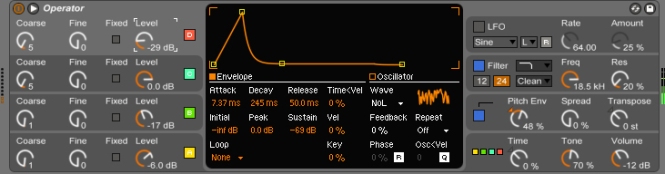
To begin shaping the character of the kick, operator B is then fed into A at a ratio of 2. As no sub frequencies are required from this operator, I begin to draw upper harmonics into this waveform using the oscillator tab. By drawing in these harmonics, the existing sound can be shaped into a more complex and harmonically rich wave shape.
Harmonics added to operator B – Feeding into carrier A
The amplitude envelope for operator B is then given and extremely short decay time of 13ms. This is so short that the human ear simply perceives this as a ‘tick’ sound. This principle will be revisited in the snare section.
Once the basic tone is shaped to taste, a pitch envelope is then applied by around 48 semitones. This is to mimic the beater striking the skin and the resonance immediately following.
In order to provide further shaping, a small amount of tone control is applied to brighten up the sound slightly with a an adjustment from the built in filter to control the top end.
The snare
A snare is based on a similar principle to the kick drum.
The snap of the stick hitting the skin.
And
The ring and buzz of the snare itself.
In order to recreate this, the same steps are taken as the kick. Operator A is set to the default sine, the only difference being that there is a slightly longer decay and a small amount of sustain.
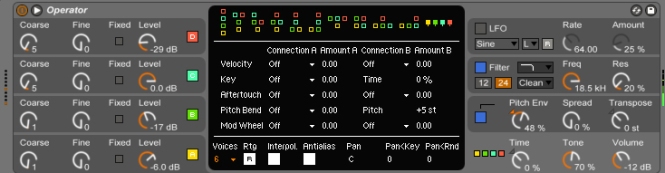
Operator in parallel mode
So that the buzz of the snare can be added, operator is run in parallel mode to free the operators. White noise looped is added to both operator C and D. Regular white noise can be used for this purpose, although white noise looped allows us to tune the noise.
Snare buzz – achieved by using looped noise
C is then used to create a small tick (in a similar fashion to the kick), while D is used to produce the buzz. This is achieved by nudging the attack time so that it does not occur at the exact same time as the initial transient.
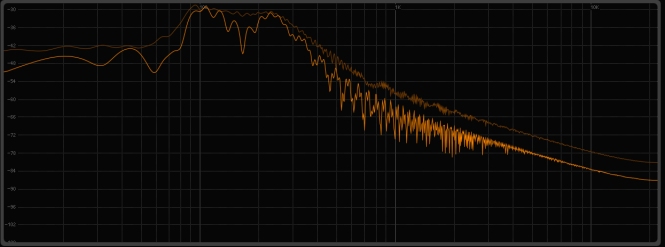
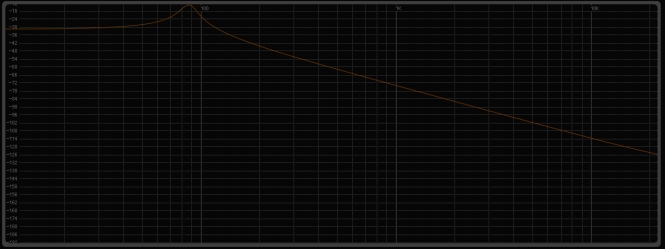
Spectrum analysis of snare
The hats
As the hats are fairly high frequency content, the same principles addressed above can be used in the same fashion. To create a sharp and snappy high hat, white noise looped is used as the operator and the amplitude envelope is set to a fast attack with a short decay and no sustain.
Extra touches
While these sounds serve well as a basic tone, processing can be applied to enhance the sound further.
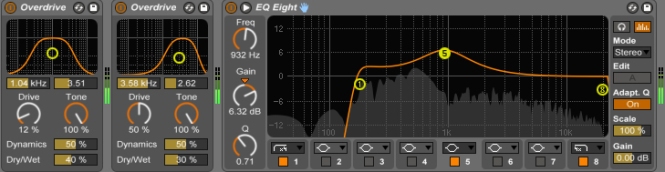
For the kick, an EQ8 with a high pass filter is applied just below the fundamental tone of the kick. This eliminates any sub harmonic frequencies that could crowd the mix unnecessarily. A small amount of overdrive is added to give the kick some extra character.

The snare is given two instances of overdrive, to enhance different ranges of the existing tone, and a shaping EQ.
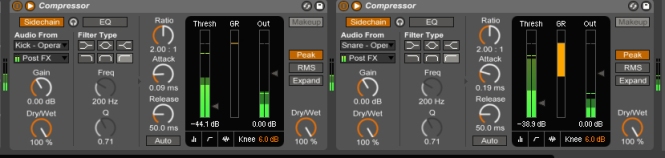
For a running high hat pattern with a little more of a human touch, two compressors are added in series. The first is side chained to the kick, the second to the snare. This creates a ducking effect on the hats.
Once the parameters have been tweaked to a satisfying amount, the channels can then be summed together into a drum bus where further processing can take place.
You can download a copy of drum loop below.
https://soundcloud.com/snknfrst/drum-synthesis-first-bounce/s-p9X94
Click here for part 2, slicing the drum loop.

[…] drum sounds from scratch by using FM synthesis in Ableton’s Operator (Click here for Part 1 – Drum Synthesis). Let’s take this a step further with on the fly editing and more control over the individual […]
LikeLike